Steffi Love's horse after transplantation - Rossie [For sale]
on
Get link
Facebook
X
Pinterest
Email
Other Apps
Rossie is the first horse that has undergone a metamorphosis in my hands and does not stay in my collection. It is the well-known in my country Steffi Love mold, which is really cute as a toy. I mark it - as a toy - because apart from the horse-like shape, it doesn't have much in common with a real horse and I can't pick on the details - it's just a toy - a cartoon, fairy-tale horse. It has colorful, cheerful eyes, a smiling face, a movable head and neck. The only flaw of this mold that can be clung to is the bald spot on the upper part of the neck, which disfigures it.
Rossie came to me along with other horses in a package. I was really curious about this mold and wanted it in my hands. Surely everyone passing through the toy section of the supermarket has come across it at some point - it has been on market for years (I mean Poland here, maybe other countries in Europe). Rossie was in good condition - original painting, braided mane, loose tail, but quite long. I assumed the hair was probably the original length. She had no equipment.
Of course, at first she went through a good wash, during which I unraveled her braid and combed her mane. After drying, the hair became pleasant to the touch. It is brown, but here and there bright reflections are visible. As for a used toy horse it is very long and in perfect condition.
The plan from the beginning assumed that I would make some nice accessories for her, I don't know if I assumed the experiment that I finally subjected her to. Well, this baldness hurt my eyes a lot. Unfortunately, I do not have in my hair warehouse a hair of a similar color. But it looks so bad... What to do??? As I combed her hair, I noticed that her mane was very thick - especially in the lower part. In the photos above, you can see that the hair touches the ground at this point.
So I had a crazy idea - I'm going to do a transplantation! The loss in the lower part will be imperceptible, while the difference in the upper part will be visible. Everything is fine, but when I cut the hair, how do I fasten it and secure it so that it doesn't fall out? I quickly decided to drown them in a hot glue and secure them with super glue - basically the same way as with my previous hair replacements.
And so it happened - I grabbed the scissors and cut a strand at the bottom. I tried to cut as close to the plastic as possible. I grabbed a glue gun in my other hand - I sunk the ends of the cut strand in the glue and waited for it to cool and harden. Then I sprinkled the place with super glue. I also used it to glue the finished strand at the top of the neck. The seam made of glue did not look very interesting, although it was somehow not conspicuous, while the horse looked much better with this one extra stripe. My assumption that the defect at the bottom will not be visible at all has become a fact. But that wasn't the end! I decided to cut off one more thin strand and make a fringe. I attached it to the seam of the glued strand - thus masking the protruding glue. I combed the pony, lightly pulled the attached hair - nothing happens! And look what it looks like:
If the designers at Simbamoved the gap for the mane one centimeter towards the head - it would be perfect. The head is movable, so the part behind the ears will unfortunately be bald, but adding a fringe changed the perspective a bit and was a hit. Even without the harness and ornaments, it looks cool.
I managed to hunt down a nice set of saddles, harnesses and other stuff for doll horses. This allowed me to give her a new harness and saddle.
The saddle and reins come from Steffi Love's pink horse from the Fairytale Riding Princess set. They are made of a flexible material, similar to that of the Tawny saddle. The bridle is probably also from a Simba horse, a bit older, also dedicated to some princess. It is plastic, but has interesting functions - one is three fasteners - as standard - a noseband and a throat strap - and additionally a header - that is, the occipital strap located behind the ears. For Rossie, undoing the latter is enough. Another interesting feature is the handle on the browband - allowing you to mount the decoration. Brilliant thing!
At first I didn't know how to attach these reins to this bridle - of course, hot glue and a pink paper clip came to the rescue - which I made small hooks of. The saddle has a visible small spot made with a pen, which did not want to give up in washing. Fortunately, it is quite small and on the uglier side of the horse - where there is no mane. There are also ink marks on the reins here and there, but nothing tragic. The bridle is light pink in color, but I don't think it bothers.
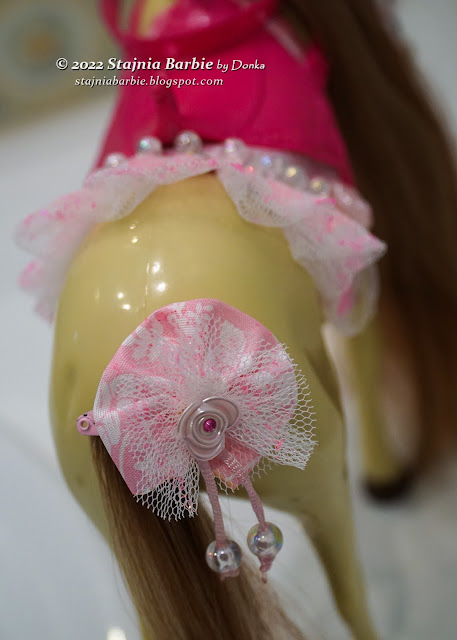
For this equipment, I made a saddle pad, a set of hair clips and a headpiece (plume).
The basis of the hair clips is rosettes made of fabric, to which I sewed rosettes of tulle, then a ribbon with beads and a bead in the shape of a rose, in the middle to which I glued a dark-pink rhinestone. At the very end, I added glitter on the tulle and glued the whole thing to a tiny pink hair clip. So, these ornaments are actually sewn, not glued.
I cut the saddle pad to the shape of the saddle, from the top there is the same material as in the clips, from the bottom - a soft dark-pink fleece.
I sewed the edge on the sides and the front with pink floss. There is tulle on the back. Along the back seam I sewed iridescent pink, transparent beads - the same ones that are in the pins. I also added pearl beads in the shape of roses on both sides. I put glitter on the tulle.
It all started with these roses on the reins, I thought it was the perfect theme. Hence the name Rossie - of course.
I think it all comes together quite well. The saddle could be brighter, but then it would probably blend with the saddle pad - and that's the contrast.
And details:
I came to the conclusion that it is difficult to take a photo where the glitter will be clearly visible. You have to believe that she really shines.
I was about to publish this post when I came up with the idea that I would make two more decorations.One for the harness and an extra one to be used as a ribbon to close the box Rossie would go to her new home in. The last one didn't work out - I didn't measure the circumference of the elastic and it was too tight for the box, but it can be used as a hair ornament for the future owner of the filly.
The first ornament is ultimately fastened on the breastplate, but it can also be put on the bridle instead of the plume or on the saddle.
Comparision
Something I like the most! There is a clear change in these pictures. Hair first:
Now from the initial stage to the end of the transformation:
I will also mention the prepared box. This is one of the boxes in which one of the horses came to me - so clean recycling. I took it on one of the evenings and covered it with a wrapping paper. By the way, do you know how hard it is to find a nice wrapping paper in a certain shade without Christmas, children's or birthday themes?


Comments
Post a Comment